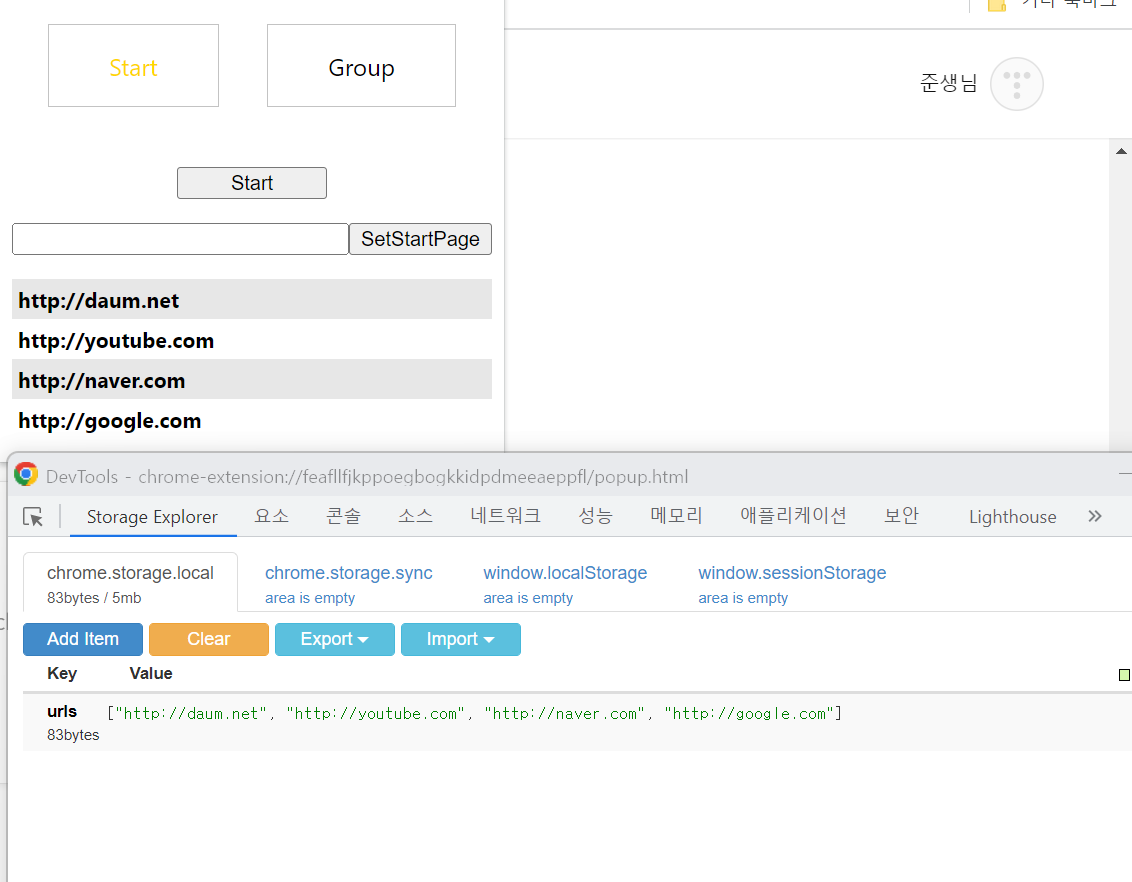
목표 : 사용자로부터 [시작하기] URL를 입력받고 이를 크롬 익스텐션 로컬스토리지에 저장 및 관리한다.
변경점 요약
> 임의로 요약된 diff 파일입니다. 주석 위주로 읽어보시면 파악이 빠릅니다.
> 자세한 소스코드가 궁금하다면 위 github 링크를 참조 부탁드립니다.
diff --git a/tutorials/tabs-manager/popup.html b/tutorials/tabs-manager/popup.html
index 6072841..45d9c96 100644
--- a/tutorials/tabs-manager/popup.html
+++ b/tutorials/tabs-manager/popup.html

// 동적으로 <li> 를 생성하기 위해 start_li_template 생성
+  <template id="start_li_template">
+    <li>
+      <a>
+        <h3 class="url">Start url</h3>
+      </a>
+    </li>
+  </template>


// 사용자로부터 input text와 저장을 위한 버튼 추가
+      <div id="container">
+        <input type="text" id="startUrl">
+        <button id="setStart">SetStartPage</button>
+      </div>
+      <ul id="start_li_item"></ul>
diff --git a/tutorials/tabs-manager/tab.js b/tutorials/tabs-manager/tab.js
index 1872ce4..0c9a92f 100644
--- a/tutorials/tabs-manager/tab.js
+++ b/tutorials/tabs-manager/tab.js


+const startButton = document.querySelector("#start");
+const setStartBtn = document.querySelector("#setStart");
+const template = document.getElementById("start_li_template");

// url이 들어오면 start_li_template 형식에 맞게 url정보를 입력하고
// start_li_item 항목을 추가함.
// a태그에는 클릭 시 storage에서 해당 url을 삭제하는 기능의 리스너를 달아줌
+function setUrlElement(url) {
+  const element = template.content.firstElementChild.cloneNode(true);
+  element.querySelector(".url").textContent = url;
+  element.querySelector("a").addEventListener("click", (event) => {
+    chrome.storage.local.get(['urls'], async function (result) {
+      let removedResult = []
+      for (let i = 0; i < result.urls.length; i++) {
+        if (result.urls[i] !== event.target.innerText)
+          removedResult.push(result.urls[i])
+      }
+      await chrome.storage.local.set({ urls: removedResult });
+      window.location.reload();
+    });
+  });
+  document.querySelector("#start_li_item").append(element);
+}


// setStart버튼 클릭 시 input Text의 값을 local stroage에 추가로 저장함.
+setStartBtn.addEventListener("click", async () => {
+  let inputValue = document.getElementById('startUrl').value
+
+  chrome.storage.local.get(['urls'], function (result) {
+    let urlList = []
+    if (result.urls) {
+      urlList = result.urls
+    }
+    urlList.push(inputValue)
+    setUrlElement(inputValue)
+    chrome.storage.local.set({ urls: urlList });
+  });
+  document.getElementById('startUrl').value = ''
+});

// start 버튼 클릭 시 local storage에 있는 url들을 새창으로 띄어줌
+startButton.addEventListener("click", async () => {
+  chrome.storage.local.get(['urls'], function (result) {
+    chrome.windows.create({ "focused": true, "url": result.urls })
+  });
+});


function init() {
   displayCurrentTab(0);
   tabsBtns[0].classList.add("clicked");
// 초기값은 local storage에 있는 url을 불러와서 세팅함.
+  chrome.storage.local.get(['urls'], function (result) {
+    let urlList = []
+    if (result.urls) {
+      urlList = result.urls
+    }
+    for (let i = 0; i < urlList.length; i++)
+      setUrlElement(urlList[i])
+  });
 }
TIP : 크롬 익스텐션 local storage 쉽게 관리 가능한 Extension 소개
익스텐션 local storage가 아닌 브라우저의 local storage는 개발자 도구(F12)의 [애플리케이션] 탭에서 볼 수 있다.

하지만 익스텐션의 로컬 스토리지 정보는 여기에 보이지 않았다.
검색해보니 익스텐션용 로컬 스토리지 정보를 나타내주는 익스텐션이 존재했다.
[Storage Area Explorer]라는 익스텐션이다.
https://chrome.google.com/webstore/detail/storage-area-explorer/ocfjjjjhkpapocigimmppepjgfdecjkb
Storage Area Explorer
Simple editor for Storage Area for Chrome Packaged Apps & Extensions
chrome.google.com
사용 방법은 다음과 같다.
1. 위 익스텐션을 브라우저에 설치한다.
2. 익스텐션 팝업창에서 오른쪽 버튼 클릭 -> 검사 클릭.
3. 개발자도구 창에서 Storage Explorer탭을 클릭한다.
4. 다음의 사진처럼 익스텐션 로컬 스토리지를 GUI 형태로 읽기 및 수정 할 수 있다.

다음 목표 : 여기까지 개발된 익스텐션을 React를 적용하여 재사용이 쉽도록 변경해보기
개인적으로 첫 프론트 개발을 리엑트로 개발했었습니다.
때문에 순수 javascript로만 개발하는 것은 저에게 익숙하지 않네요.
이제부터는 저한테 익숙한 React 환경으로 프로젝트를 재구성해보겠습니다.
'Extension 튜토리얼' 카테고리의 다른 글
| 크롬 익스텐션 튜토리얼 (8) Tabs Manager - 탭 기능 만들기 (0) | 2023.01.07 |
|---|---|
| 크롬 익스텐션 튜토리얼 (7) Tabs Manager - 새 창에 지정한 URL 띄우기 (0) | 2023.01.06 |
| 크롬 익스텐션 튜토리얼 (6) Tabs Manager - 그룹화 해제 기능 (0) | 2022.12.31 |
| 크롬 익스텐션 튜토리얼 (5) Tabs Manager - hostname별 그룹화 (0) | 2022.12.31 |
| 크롬 익스텐션 튜토리얼 (4) Tabs Manager (0) | 2022.12.30 |


